

Air Frying 101: Our dos and don’ts
Oil, no oil or spray and cook? From the prefect crispy roast chicken to really putting the humble potato to the test and more, here’s the lowdown on this modern-day convection oven.
DO:
- Ditch the microwave for reheating.
- Shake it! Give the basket a shake or turn your food halfway through cooking to ensure it not only cooks evenly but crisps up on all sides.
- Use it for baking and roasting alike.
- Clean after each use.
- Keep an eye so that the food doesn’t burn or go too dark.
- Use oil over butter.
DON’T
- Preheat your air fyer, it’s not needed!
- Block the air flow!
- Cook anything that has been wet battered.
- Douse your food in oil for cooking!
- Overfill or overcrowd!
- Air fry food that is light weighted.
Get more in-depth tips in the February issue of MyKitchen, plus our tried-and-tested guide to making a vanilla sponge cake, hand-cut potato chips, frozen chips and a roast chicken in an air fryer.
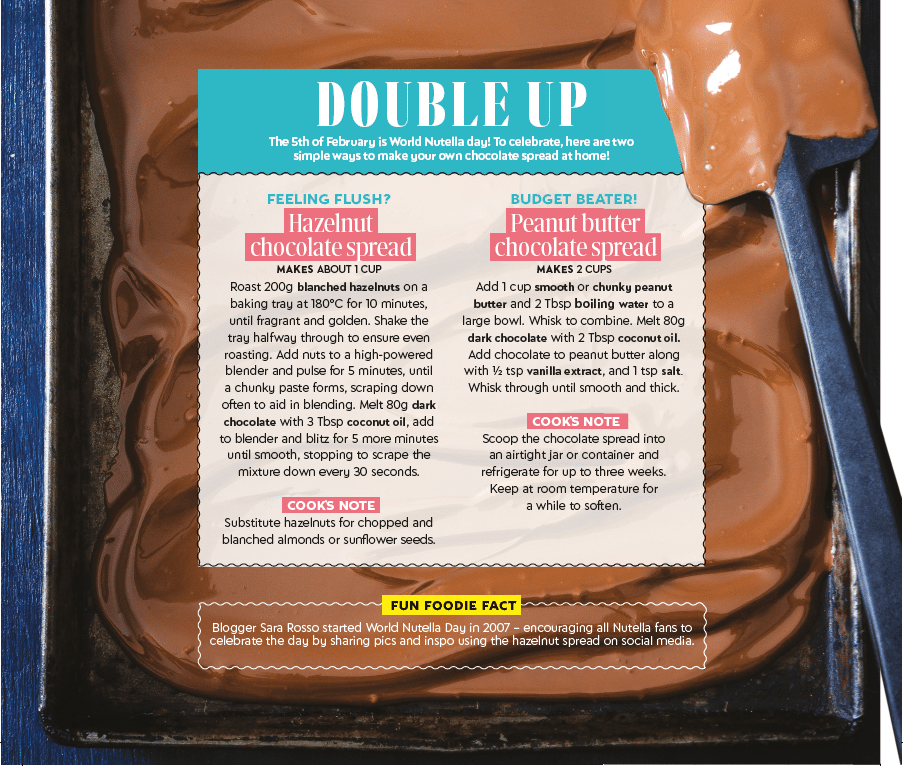
Cook’s Note: Make your own Nutella!
Bake the cover: Tarte au citron
For the all lemon lovers out there! Reduce the sugar for a tangier result.
SERVES 4-6
Ingredients
1 roll (400g) shortcrust pastry, defrosted
lemon, zested and juiced
lemons, juiced (1 cup juice total)
¾ cup (150g) castor sugar
125g butter, cut into cubes
4 eggs
Edible flowers (optional)
FOR THE CANDIED LEMON SLICES
1 cup sugar
1 cup water
2 lemons, sliced
Method
- Grease a 23cm round loose-bottomed tart tin.
- Roll the pastry out into a circle large enough to fi t up the sides of the tin.
- Press pastry into the base and sides of tin, prick base all over with a fork. Freeze for 20 minutes.
- Preheat oven to 180°C.
- Cover base of pastry with baking paper and add rice or beans to weigh down.
- Bake for 12 minutes, remove paper and beans and bake for another 4-6 minutes, until golden. Remove and cool.
- For the lemon curd, add the lemon zest, juice, sugar and butter to a pot over medium-low heat.
- Whisk the mixture until sugar has dissolved and butter is melted, then add eggs and whisk to combine.
- Increase heat to a gentle simmer and whisk until the mixture is thickened, about 10-15 minutes. Do not overheat as you will scramble the eggs.
- Pass the lemon curd through a fine mesh sieve into a jug to remove any unwanted specks of egg or lemon seeds.
- Pour curd into tart base, smooth over with a spatula.
- Bake tart for 5 minutes, then remove and cool completely before refrigerating for 3 hours.
- For the candied lemon slices, add the sugar and water to a pot and bring to a boil, stirring to dissolve the sugar.
- Add the lemon slices to the boiling mixture and cook for about 15 minutes, until translucent.
- Remove and drain on a wire rack until cool.
- Remove the tart from mould and place on a serving plate.
- Decorate with candied lemon slices and edible

This month in MyKitchen - January 2024
Hot off the press: MK’s new Instagram page
Welcome to our brand-new Instagram page, fresh out the oven! Follow to keep getting mouthwatering recipes, glimpses into our studio kitchen, top tips and tricks and so much more. Plus, there’s an incredible prize up for grabs… Details on our new feed!
Cook’s Note: The Aftershock
The first of January is International Bloody Mary Day – and for good reason! If you indulge in a drink or two then you might know that the Bloody Mary (a drink consisting of vodka, lemon juice, black pepper, salt, tomato juice and Tabasco) is also known as the unoffical hangover cure. People around the world like to use it as a way of recovering after all the New Year’s Eve festivities.
To celebrate this day, take it one step further by pairing it with a simple cream cheese ball rolled in bacon bits and herbs to take the edge off (and recover)!
Simply season smooth cream cheese or cottage cheese, and roll tablespoons of the mixture into balls. Then roll each ball into chopped crispy bacon bits and fresh herbs. Dip these balls into your Bloody Mary, garnish with cucumber or celery and enjoy immediately. Simply omit the alcohol for a booze-free mocktail alternative!
")
Freezing 101: Fresh fruit edition
1. WASH, DRY & SLICE
Wash and dry fruit thoroughly before cutting it up. Remove any stems, cores and bits you would not want to eat. Cut up the large fruit, but keep the berries whole.
2. PRE-FREEZE
Pre-freezing prevents the fruit from sticking together – that way you don’t end up with a solid chunk. This makes it easier to defrost or blitz, plus keeps the fruit’s pretty shape for bakes. Line a tray (that fits into your freezer) with baking paper and spread fruit in a single layer. Freeze for 2-3 hours (or until completely frozen).
3. BAG ’EM UP
Transfer your prefrozen fruit into resealable bags or freezer safe containers. If using bags, get out as much air as you can to avoid freezer burn.
4. LABEL AND STORE
Label your fruit (using a food-safe marker) with the date and type of fruit before storing in the freezer for up to 6-9 months. When ready to use, simply thaw your fruit in the fridge overnight or place in a bowl of cold water. Be sure to only thaw as much as you need, you don’t want to re-freeze it!

0 / 5. Vote count: 0